Updates from August, 2018 Toggle Comment Threads | Keyboard Shortcuts

  • jkabtech 4:17 am on August 5, 2018 Permalink |
    Tags:   

    How to Block SMS Spam on iOS 11 

    Highlights SMS spam can be blocked easily on iOS 11 You need to install third-party apps from the App Store for this These apps sort spam messages into a folder called SMS Junk

    SMS spam is something that plagues pretty much everyone who has an Indian SIM card, and even those who live abroad. Be it frauds, asking you to buy shares in companies to double your wealth, or just your neighbourhood store sending promotional messages, these messages get more annoying by the day. Not only do they spam you with notifications, these texts also get in the way of iMessage since Apple’s messaging service also uses the same Messages app.

    This means that you’re better off getting rid of these spam messages. You could easily do this in iOS 9 but on iOS 10 that method stopped working. Your only option was to disable notifications for these messages manually. That’s quite a tiring task, but with iOS 11, third-party apps can help you get the job done quite easily.

    Before you start blocking SMS spam, you need to be aware that the third-party apps you use to solve this problem will be able to read your messages. If your privacy is very important to you, this could be an issue. Be sure to read the privacy policy of the app and see if the developer appears reliable and has other apps with good reviews as well. Note that this doesn’t affect iMessage in any way, as these apps can only read SMS and MMS messages.

    These steps will help you block spam texts on iOS 11:

    Download an SMS spam blocking app (we’ve mentioned our favourites below). Go to Settings > Messages. Under Message Filtering, tap Unknown & Spam. Under SMS Filtering, select the spam blocking app you want to use.

    SMS spam blocking apps on iOS 11
    There are several SMS spam blocking apps on the App Store and we used many of them since the launch of iOS 11 to figure out which ones work the best. These three apps are our favourites.

    SMS Shield

    View the Original article

     
    • www.behance.net 2:37 am on December 2, 2018 Permalink | Log in to Reply

      Wonderful goods from you, man. I’ve understand your stuff
      previous to and you are just too wonderful. I actually like
      what you’ve acquired here, really like what
      you are stating and the way in which you say it. You make it enjoyable and you still care for to keep it smart.
      I cant wait to read far more from you. This is really a tremendous
      site.

      Like

  • jkabtech 8:17 pm on August 4, 2018 Permalink |
    Tags:   

    How to Book an Uber or Ola Cab Without the App 

    Highlights Ola supports booking via the Web from PCs The Uber mobile website can also be opened from PCs to make bookings There’s also an Uber app for Windows PCs

    When you need to take a cab, you probably pull your phone out and start the Ola or Uber app (depending on which one you prefer), and make your booking. But if you’re sitting in front of your PC in the office, you don’t actually need to take the extra step, and can book your cab without pulling out your phone.

    It’s actually easy to book a cab from your computer using just the web browser, and Ola officially supports desktop bookings while for Uber, you need to make use of one simple trick to make it work for you. Here’s what you need to know, along with a few other useful tricks that make using Uber from your PC a breeze.

    How to book Uber without phone app

    Booking an Uber without a phone is equally simple, but there is one extra step you need to know, because the Uber website on desktop doesn’t let you book a cab. Instead, you have to use the mobile website. Here’s how it works.

    View the Original article

     
  • jkabtech 12:17 pm on August 4, 2018 Permalink |
    Tags: , , , ,   

    iOS 11 is Out Now: How to Download and Install iOS 11 on Your iPhone, iPad, or iPod touch 

    iOS 11 is available to download now

    Highlights iOS 11 download for iPhone, iPad, iPod touch is out now Lots of iOS devices are supported with this free update You can download it on your device or a computer via iTunes

    iOS 11 is now available for eligible iPhone, iPad, and iPod touch models, with the update hitting Apple devices released as far back as 2013. New iOS 11 features include Siri’s new translation feature, the animated emojis for iPhone X, a redesigned Control Centre, peer-to-peer Apple Pay, portrait lightning on iPhone 8 Plus and iPhone X (in beta), front-facing portrait mode, improvements in screenshot capturing, and more.  

    Before you update, of course, be sure to back up all of your data because you don’t want to lose your precious photos, messages, or documents. Here’s how you can download iOS 11 on your iPhone, iPad, or iPod touch.

    iOS 11 Is Out, Here’s How to Check if All Your Apps Will Work Before Installing the Update

    .embed-container

    View the Original article

     
  • jkabtech 4:17 am on August 4, 2018 Permalink |
    Tags: , , , ,   

    iOS 11 Brings Improved Dock and Multitasking to iPad: How to Get Started 

    Highlights iOS 11 lets you open any two apps side-by-side These apps are grouped, you can quickly switch between them The Dock has received a complete makeover too

    iOS 11 brings in lots of productivity oriented tweaks and the multitasking related features are chief among these. Apple has made it much easier to multitask on an iPad with iOS 11, and it has revamped the Dock to make it easier to access your favourite apps faster. You can now do things such as drag multiple pictures out of your photo album to the Messages app open side-by-side with Photos. If you have an iPad and would like to get started with multitasking on iOS 11, read on.

    .embed-container

    View the Original article

     
  • jkabtech 8:17 pm on August 3, 2018 Permalink |
    Tags: ,   

    How to Get Started With Files App on iOS 11 

    Highlights iOS 11 has one app to manage files across your apps. It’s not a Finder replacement just yet The app aggregates apps such as iCloud Drive, Google Drive, etc.

    The Files app is one of the most significant changes in iOS 11. The iCloud Drive app no longer exists and instead we have an app called Files. With this, all of your files will be in one place

    View the Original article

     
  • jkabtech 12:17 pm on August 3, 2018 Permalink |
    Tags: , ,   

    Dual WhatsApp: How to Run Two WhatsApp Accounts on One Phone 

    Highlights It’s possible to have two copies of WhatsApp on one phone Obviously, it has to be a dual-SIM phone Some phone makers offer it as a built in feature

    If you’ve got a dual-SIM phone, you can use the different SIM cards to make calls using separate numbers, and send texts using different numbers. But did you know that you can set up dual WhatsApp accounts, and use them both on the same phone? If you’ve ever wondered how to install two WhatsApp accounts on one phone, then you’ve come to the right place. There are a few different ways to do this, and some phone-makers are offering this as a built in feature. In other cases, you’ll have to resort to third-party apps instead, but it’s actually pretty easy to run two WhatsApp accounts on one Android phone. Sorry iPhone users, you are out of luck without resorting to the kind of methods we wouldn’t recommend.

    Obviously, this method of running two WhatsApp accounts on one phone requires a dual-SIM phone – WhatsApp uses the phone number as your identity, and detects this via an SMS or call, so it has to be a phone with two SIM cards, which also out any iPhone. If you have a dual-SIM phone though, then the next step should be to check your settings, because it’s quite possible that the manufacturer has already created settings or dual WhatsApp.

    Many Chinese manufacturers allow you to create clones of apps, which can then be used with a dual-SIM setup. For example, on Honor’s EMUI skin, the feature is called App Twin. On Xiaomi phones it’s called Dual Apps. Vivo calls it App Clone, while Oppo calls it Clone App. The way each of these companies has set it up varies a little, so you’ll want to check specific information for your handset, but we’ve listed the steps for some of the popular brands first. In case your phone doesn’t support this feature, there’s one more workaround you can try, listed at the end.

    If you have an Oppo, Xiaomi, Honor
    If you have one of these phones, then the steps you need to follow are incredibly simple, and they’re also very similar across all three manufacturers, which is why we’ve gathered them together in one place. In all three cases, you’ll start by installing WhatsApp on your phone via Google Play. After that, you can clone the app in the phone’s settings.

    View the Original article

     
  • jkabtech 4:17 am on August 3, 2018 Permalink |
    Tags: , ,   

    How to Get 280 Characters Per Tweet Right Now 

    Highlights Twitter has increased the 140-character limit to 280 This feature is not available for all users Using this guide you can enable it now

    Twitter has always been about brevity, but the company appears to be loosening its strict 140-character limit for every tweet. As an experimental feature the company has allowed some people to use up to 280 characters per tweet. Like every major change to products lots of people use, this one has proved to be polarising. Some people love it while others just don’t. No matter which side of the debate you are on, you can try the feature for yourself and decide whether you like it. If Twitter has enabled it on your account, fantastic. If not, these steps will help you double the character count of each of your tweets.

    How to tweet 280 characters on Twitter.com

    If you are on Google Chrome, follow these steps:

    Open Tweetdeck and sign in with your Twitter account. Click View > Developer > Developer tools Click the Sources tab. Now click on the > button and select Snippets. Click New Snippet. Now go to this Github page and copy the code you see there. Alternatively you can copy it right here:TD.services.TwitterClient.prototype.makeTwitterCall

    View the Original article

     
  • jkabtech 8:17 pm on August 2, 2018 Permalink |
    Tags: ,   

    How to Transfer PF Online 

    With more and more government functions going online, we feel it is important for our readers to know how to use the different tools that are now available. After all, it is now possible to file an RTI, apply for a passport, apply for a PAN card or download a copy of your Aadhaar card, all from the comfort of your own home.

    Nearly everyone who’s employed has also probably quit a job at some point. Changing jobs involves enough paperwork to make your head spin. One of the most irksome bits of paperwork involves a significant chunk of the deductions section in your salary slip – Employee Provident Fund (EPF), or PF as most people prefer to call it. Most of us never look at the EPF account number and the company code that’s needed to transfer the amount to the new employer. Instead of panicking after quitting a job, you can take a look at these steps and learn how to transfer your EPF right away.

    First, you need to check if your EPF account is eligible for a transfer claim. You can do this via the EPFO website.

    The step above requires you to know the state in which your present and previous employers have registered your account, apart from which PF office the accounts fall under. You need to select these from a drop-down menu.

    You will also need the region, office, and establishment codes of both employers and the PF number. You can get all these details from the accounts departments of those companies.

    Once you’ve keyed in all the details, click Check Eligibility.

    You will then see a popup that states whether the account is Eligible, or Not Eligible. If your account is eligible for a PF transfer, then create an account on the EPFO website.

    You’ll need to pick a valid photo ID such as your Aadhaar, PAN card or driving licence, and enter that ID number here sign up. The signup process also involves sending a verification code to your mobile number. Fill in all the details, and click GET PIN.

    At the bottom of the screen, enter the PIN you just received, and click Submit.

    On the next page, you’ll see a confirmation message. Click on Please click here to continue further.

    Now, go to the EPFO Member Claims Portal, and log in. On the left side, you’ll see a log in box. Pick the document type (the ID you chose during registration), enter the ID number and your mobile number.

    Click Sign In, and a page with all your options will load.

    Move your mouse over the Claim link in the top bar, and click Request for transfer of account.

    Now you will have to fill the PF transfer form. It is divided into three parts.

    Part-A comprises your personal information. Apart from your name and email, you’ll have to enter your salary account number and the IFSC code of the bank.

    Part-B asks you to fill in details of the previous PF account, similar to step 1. If you don’t know the details, you can click on Click here to get details next to the field for PF number.

    Part-C requires details of your current PF account, as you did in step 1. Once again, if you don’t know the details, you can click on Click here to get details next to the field for PF number.

    You’ll need to get the claim attested through the previous or current employer. Select Previous Establishment or Current Establishment at the end of the form depending on whichever is easier for you. Settlement is faster if attestation is through your previous employer, but it is mandatory.

    Now that the form is filled, click Preview.

    You’ll be shown a preview of all the information you’ve entered. Double-check all of this for errors. If you need to change anything, click To change information, click here. That will take you to the previous page.

    If you’re sure all the information is correct, enter the characters in the image in the box next to it, and click GET PIN at the end of the form.

    Check I Agree.

    You’ll get the PIN via SMS. Enter the PIN in the box below I Agree, and click Submit.

    You’ve now successfully filed your PF transfer claim. You can check the status of the claim by clicking here.

    For more tutorials, visit our How To section.

    For the latest tech news and reviews, follow Gadgets 360 on Twitter, Facebook, and subscribe to our YouTube channel.

    Tags: EPF, EPF India, Employee Provident Fund, How to Transfer Your Employee Provident Fund, Transfer EPF

    View the Original article

     
  • jkabtech 12:17 pm on August 2, 2018 Permalink |
    Tags: , ,   

    How to Download and Watch The Interview 

    You don’t need to leave your house to watch “The Interview.” Sony Pictures released the comedy on digital platforms Wednesday.
    The online release comes a day after the studio reversed its previous decision not to show the movie after hackers stole internal documents and emails from Sony. The U.S. said North Korea was behind the hack. In “The Interview,” Seth Rogen and James Franco play journalists tasked by the CIA with killing North Korean leader Kim Jong Un.

    Viewers can rent the movie for $5.99 (roughly Rs. 377) or buy it for $14.99 (roughly Rs. 940). Rentals are good for 48 hours. The movie’s running time is 1 hour, 52 minutes.

    Here’s where you can watch “The Interview” online
    Google Play
    Buy or rent the film from Google Inc.’s platform. The movie can be viewed on the Google Play app for Android and Apple devices, as well as through some streaming devices including Roku and Google’s Nexus Player.

    Link

    YouTube
    The video site, also owned by Google, has “The Interview” available to rent or buy on its movie page. It can be viewed on a website, YouTube’s app and selected streaming devices including Apple TV, PlayStation and Xbox.

    Link

    Xbox
    This option is for those who own Microsoft Corp.’s Xbox video game console, a Windows smartphone, or a computer or tablet that runs Windows 8 software.

    Link

    Sony
    The studio, owned by Sony Corp., set up a separate website where viewers can rent and stream the film online.

    Link

    For the latest tech news and reviews, follow Gadgets 360 on Twitter, Facebook, and subscribe to our YouTube channel.

    Tags: Apple TV, Google, Google Play, Home Entertainment, Internet, Microsoft, Roku, Sony, Sony Pictures, The Interview, Xbox, Xbox Videos, YouTube

    View the Original article

     
  • jkabtech 4:17 am on August 2, 2018 Permalink |
    Tags: Webpages   

    How to View Lost Webpages 

    If a webpage you wanted to open is not accessible – for which the reasons could range from a temporary network issue to a page being removed from the website entirely – then you don’t need to lose hope. It’s actually possible to recover backed-up versions of most pages from the Internet with just a little know-how. The whole process is incredibly simple, and you’ll find it very useful if you’re to research a topic, and you discover that the links you’ve been saving for weeks or even months no longer work.

    If you want to read a webpage that has been deleted or is otherwise not accessible anymore, this is what you can do.

    Wayback Machine

    Archive.org’s Wayback is probably the best tool to recover any deleted webpage. It is a part of the Internet Archive, a non-profit organisation that tries to duplicate all content on the Internet. It has saved over 435 billion Web pages, which probably isn’t all the content on the Internet, but is still impressive. Pages are captured multiple times so for example we used the Wayback Machine to look at the NDTV Gadgets homepage across several different years, and saw our design evolving with time.

    View the Original article

     
  • jkabtech 8:17 pm on August 1, 2018 Permalink |
    Tags: , , , Remotely,   

    How to Remotely Control Your Computer From a Phone or Tablet 

    Your dad is having an issue with the computer at home but in spite of giving him instructions for an hour, he can’t seem to fix the issue. One way to make sure he’s actually following the steps you’re dictating over the phone would be to use his phone as a webcam to quickly look at the screen, but an even better option would be to just take over his computer from your phone or tablet, and resolve things yourself over the Internet. How do you do that? That’s where we step in. Read on:

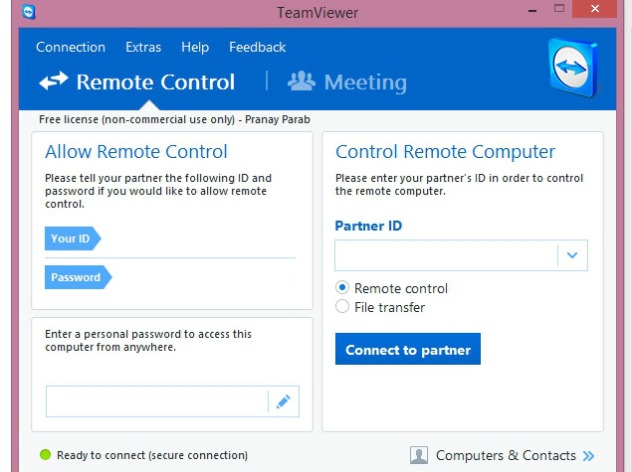
    The first thing that’s needed is a little foresight. Download and install TeamViewer on your parents’ computer now, and on your smartphone or tablet too. TeamViewer is free for personal use on Windows, Mac, Linux, iOS, Android, Windows Phone and BlackBerry, and you can find the download links for all these platforms on the TeamViewer page.

    Make sure both the computer and the phone are connected to the Internet.

    Open TeamViewer on the computer.

    Note down the ID and password that’s displayed in TeamViewer – or have someone tell it to you on phone.

    Fire up TeamViewer on the smartphone or tablet.

    Enter the ID and password you noted down earlier in the smartphone/ tablet TeamViewer app.

    Tap Remote Control.

    Now you’ll see the computer’s screen on your phone or tablet. You can control it easily now.

    TeamViewer works across the Internet, and not just when the two machines are connected to the same network, so you can now troubleshoot problems on your parents’ computer right from office, or if you’ve installed the program on your home desktop, you can access your files and send those emails you were supposed to have saved to your laptop. You can tap on the screen to simulate a mouse-click, and if you tap on a text entry field, a virtual keyboard pops up so you can type.

    There can be a little delay in what you’re doing on the mobile and what’s happening on the computer, depending partly on the speed of both Internet connections, so it’s not the same as being there, but if you just want to troubleshoot something urgently, or if you need to get some important work finished, TeamViewer can be a lifesaver.

    There are many more remote connection apps that let you control your computer via your phone or tablet, but we picked TeamViewer because it is extremely easy to use, as you can see from the steps above. TeamViewer is also free for personal use, so that’s an added advantage.

    Which method do you use to control your computer from your smartphone? Let us know via the comments. You can always find more tutorials in our How To section

    For the latest tech news and reviews, follow Gadgets 360 on Twitter, Facebook, and subscribe to our YouTube channel.

    Tags: Android, Apple, BlackBerry, Control Computer From Phone, Google, Linux, Mac, Microsoft, OS X, Teamviewer, Windows, Windows Phone, iOS

    View the Original article

     
  • jkabtech 12:17 pm on August 1, 2018 Permalink |
    Tags: , , ,   

    How to Book Train Tickets With IRCTC Using SMS 

    Our government is going increasingly digital and with mobile penetration and number of smartphone users in India skyrocketing, it’s getting easier than ever to do things online or via our phones. The catch is that most people don’t actually know you can do all this so easily – and that’s why we are trying to help our readers find out about different government services that are now online, and showing you how to use them.

    This week, we look at how to book a train ticket from IRCTC via SMS. The Indian Railways’ IRCTC website is the source of frustration for so many people that no one bats an eyelid when the site doesn’t work properly, although recent updates have improved things a little. If you’re trying to book a ticket on the website, but find that the portal is down or if your Internet is down, you can easily book tickets offline. No, we don’t mean that you have to go to the nearest railway station to book a ticket, but booking tickets via SMS. Booking via text message is hassle-free, but know that your carrier will charge you for each SMS you send. We were charged Rs. 3 per SMS when we tried booking tickets via SMS, but that’s a small price to pay for the convenience. Here’s how to do it.

    The first thing you need is an IRCTC account. You can create it here. Make sure that the phone number you register with IRCTC matches the phone number that your bank has, otherwise this will not work.

    You also need to check if your bank supports IMPS (Immediate Payment Service). If you have an ICICI Bank account then you don’t need IMPS, and can jump to step 8. You can check if your bank supports IMPS here. You will need IMPS to authorise payments via SMS.

    If your bank supports IMPS (almost all banks do), then you’ll need to call them to generate an MMID or do it on the bank website. This process varies by the bank, so we suggest you check it with your bank. As an example, HDFC Bank’s process is described here.

    Note down the MMID and the one-time password (OTP) sent by the bank.

    Now you’re ready to book your ticket. You need to send a text message to 139. The format of the message should be

    View the Original article

     
  • jkabtech 4:17 am on August 1, 2018 Permalink |
    Tags: , , ,   

    How to Disable Notifications in Google Chrome 

    Desktop notifications are one of the best features of modern browsers. They show previews of email, football scores or even instant messages, letting you to take a quick glance at updates without leaving the work you’re doing. But this can get a little overwhelming, particularly when it includes spam and advertisements. If too many sites have begun to send notifications, or if you need to shut out all the noise, you should disable Google Chrome notifications. Doing so is pretty simple:

    Open the Google Chrome Settings page. You can either type chrome://settings in the address bar and hit Enter or click the hamburger icon at the top right > Settings.

    Scroll to the bottom and click Show advanced settings.

    Under Privacy, click Content settings….

    Scroll down to Notifications.

    Select Do not allow any site to show desktop notifications.

    If you want to allow some websites to show notifications, you can click Ask when a site wants to show desktop notifications. Now sites will show notifications only if you permit them to.

    Click Manage exceptions… to see the list of sites that you’ve granted permission for notifications. Click the X to the right of any of these URLs to stop the site from sending notifications.

    View the Original article

     
c
Compose new post
j
Next post/Next comment
k
Previous post/Previous comment
r
Reply
e
Edit
o
Show/Hide comments
t
Go to top
l
Go to login
h
Show/Hide help
shift + esc
Cancel